

Have you ever taken a photo when it’s overcast, and when you got home, looked at it on the computer, and you were thoroughly disappointed ? – this has happened to me many, many times. Until now I didn’t know how to solve this annoying problem.
Google is full with guides of how to make grey skies blue, but all of them seem more effort than they are worth, really I don’t want to replace the entire sky with a fake one.
Easiest other solution is just to take the picture on a nice sunny day. However that means missed photo opportunities 😦
Note: Photoshop is a great tool for editing photos, but it often feels like I need a PHD in Photography to drive it. The only way really is to start to “get my hands dirty” with it and start trying to do the stuff that I want to do. Over time gradually I’ve learnt quite a lot of what’s possible and how to do it. Cartooning has certainly helped me with this, see me posts here and here for more details.
So is there any easy solution to make grey skies blue in Photoshop ?
Yes (Photoshop CS6) … Image Menu -> Adjustments -> Photo Filter -> Cooling Filter (Blue)
Note: In Photoshop CS6 I like the Image->Auto (Tone, Contrast, Colour), used in conjunction with the Image->Adjustments->Brightness/Contrast (Brightness), it’s possible to tune up a photo quite quickly. Have a play with these.
So how to get that nice blue sky
1. First load the photo into Photoshop.
2. Now use the “magic wand” tool to select the sky, the tool will generate a marquee (the dashed lines that move). It generally doesn’t get all of the sky in one go, so you’ll need to hold down the SHIFT key and click on the bits it’s didn’t get first time round. If it selects something that isn’t sky then use CRTL+Z to undo. Then zoom in and try again in a slightly higher spot (ALT key and mouse wheel is useful quickly zooming in and out). Keep on doing this until all the sky is selected.
Note: I suggest adjusting the brightness of the sky separately and after the “Not sky”.
3. Now do Select->Inverse. This will select the “Not sky”.
4. Use Image->Adjustment->Brightness/Constrast to adjust the brightness of the “Not sky” to where you’d like it to be.
5. Do Select->Inverse again. This will select the sky.
6. Do Image->Adjustments->Photo Filter and select one of the cooling filters (80, LBB and 82 or Blue). Filters 80 seems to work well, 82 gives a lighter blue. You can now adjust the Density, default is around 25%, higher levels will start to remove more and more grey, so move this up or down until it’s just so.
7. Finally do Image->Adjustment->Brightness/Constrast to adjust the brightness of the sky to where you’d like it to be.
8. Sit back and enjoy your newly blue-sky’ed photo.
Additionally, if you have things like leaves and trees, then the magic wand stage might take a little longer. Results are worth the effort 🙂
Conclusions
Making a blue sky on a photo in Photoshop isn’t that difficult, really it isn’t. It can be done easily with the Blue Cooling Photo Filter in conjunction with magic wand, simple:)
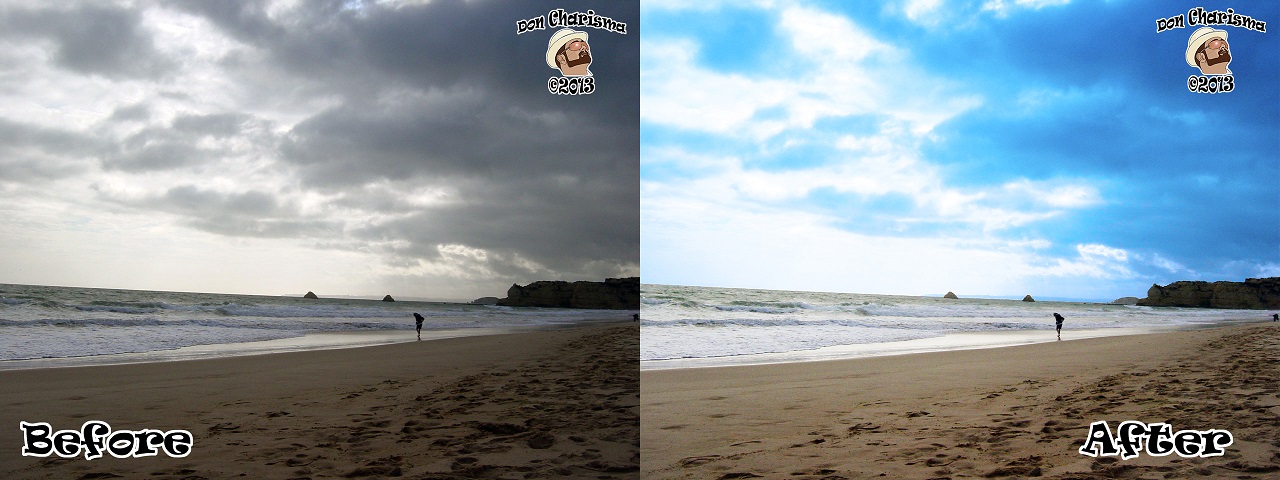
Note: In my before and after photo, more subtle blue skies are possible, but mine is very very blue to show the effect.

deep blue clouds then? hmm.
Thanks for the photo editing tips. I am a beginner and it is great to have such tips available.
You’re welcome 🙂
Reblogged this on Ancien Hippie and commented:
Don is getting to be a popular guest author
Thank you for all the good information, and the comments are so good also. I appreciate the follow me, I may be new now, but I am learning so much.
You’re welcome, and soon, you’ll be an old hand like the rest of us, so enjoy it while it lasts 😀
Thank you for following me. I had my DLSR 9 months ago and just start learning Photoshop, thank for sharing the tip.
You’re welcome … and yes it’s a little useful way to the blue sky back on photos that didn’t come out how we wanted 😀
Reblogged this on Photos That Inspire Words.
Thanks for the reblog 😀
Great post!!
Thanks 😀
Hey doncharisma, thanks for the follow. Love your blog!
My pleasure and thanks for following my blog:)
Great work Don. Bookmarking it for when it’s needed.
MY pleasure, hope will be useful:)
NICE
THanks:)
Reblogged this on XP Web Service and commented:
I’ve always found that searching for the right photos for, say a banner slider, is tough. Here’s a way to touch up some photos you may not have considered possibilities at first.
Thanks for the reblog:)
Wow, what a great effect
I guess I better study some photoshopping 🙂
LOL, thanks … some people have mentioned Photoshop elements, I think it may be a bit easier to use and has a lot of the Photoshop features … Cheers Don Charisma
Hello Don Charisma,
Thanks for the follow and nice tips for the photo’s will definitely use this in the future
My pleasure and thanks for following me … I will bring more Photoshop tips as and when I figure them out ! Cheers Don Charisma
never knew about the invert option 😛 that’s just brilliant… learn something new every day… and didn’t know about cooling filters too lols…. for ‘elements users’ the cooling filter can be found under ‘Filter > Adjustments > Photo Filter’ …. now to have a play & thank you! 😀
hey bruceky, my pleasure I just stumbled across this by luck ! How do you find elements compares with photoshop is it easier to use ?
That’s a good stumble then 🙂 elements came with the computer and it’s been a while since I’ve tried to do much with photoshop, but i think normal photoshop is a bit easier to find your way around and also has much more options to work with… i’ve always thought elements is the budget version but it seems to do the trick for now while i’m learning how to use it. Most of my photos are either iPhone edited or straight from the camera with just cropping and nothing much else
For me monkey and typewriter springs to mind, I just keep on pressing all the buttons until it does what I want !
I reckon elements is a budget version, but from what I’ve heard it seems to have many of the same features as full blown PS and maybe easier to use. My camera was stolen a while back, so I’m just playing with either old photos or ones taken on iphone/ipad. One feature I’m playing with is the Photomerge/Panorama for getting either a higher quality picture or a wider field of vision from what I have available. Will post some Panoramas when I get a chance 🙂
Good to hear from you keep in touch, Cheers Don Charisma
I am such a dweeb, I can’t believe I never thought to use the cooling filter on the sky!!! Boy is my face red…. lol thank you ❤
If it’s any consolation, I’m like a monkey with a typewriter most of the time myself, just keep on playing with it until it works !
LMAO!!
Reblogged this on digger666.
thanks for the reblog:)