
How I Cartooned myself, by Don Charisma
I’ve been wanting to do this for a long time, finally managed to find the right time and space to get it done. And this is what I came up with :
![]()
I didn’t like all of the aspects of the original photo, never really considered myself particularly “photogenic” and really loved the idea of a cartoon like image of me. For my blog and my ever growing number of accounts where a profile avatar is optional, but needed really, it’s what I really wanted.
I don’t know any graphic designers or cartoonists, and wouldn’t know how to explain what I wanted even if I did…
So, in my searching around on Google looking for a “quick fix”, that is an app or a website that would do it for me for free, I found an unusual bunch of waste of time sites that could make my photo look, well crappy really, with what looked like worms growing out of my face, why would anyone want that ? I have to say that I can’t recommend any of these cartoonify for free sites, they just don’t do what I want and didn’t really like the look much of the examples on the paid sites.
This process went on for some time, I’ve looked and looked over the months, must be years by now – well not looking for websites, I don’t sit at my PC 24/7 looking for cartoonify sites, I do have a life as well.
So I thought maybe I can do it myself, I have Photoshop and at least half a brain. Some more Google searches later and I stumbled across FallenDesignsUK video tutorial on YouTube. From what I understand Stephen Bradbury the videographer is a graphics design student and only 17. I was amazed at what I saw in his video, it changed things from being a nigh on impossible task to within the realms of possibility. Very impressed and amazed with what he showed me is possible and actually not that difficult.
His “Photoshop Cartoon Effect Tutorial #1” is here – http://www.youtube.com/watch?v=dMRuDE-anww
You can also find other examples of his work (images not videos) here – http://www.behance.net/gallery/Illustrations/6022197
Needless to say not much point in me giving you the full tutorial, Stephen has done a splendid job in his videos, highly recommended and worthwhile you watch if you want to do this yourself.
So here’s some words of wisdom about bits that were challenging whilst doing my cartoon the FallenDesignsUK way.
Pen Tool

What I learn’t relatively quickly is that a basic skill in using the pen tool is a must, a vital and very worthwhile.
It is quite hard to get used to at first, so practice really does help – you will find you can master it quicker than you think, so keep at it and don’t worry too much if you make mistakes at first.
The pen tool helps you get those nice smooth curves and is used for both outlining and for filling.
Layers
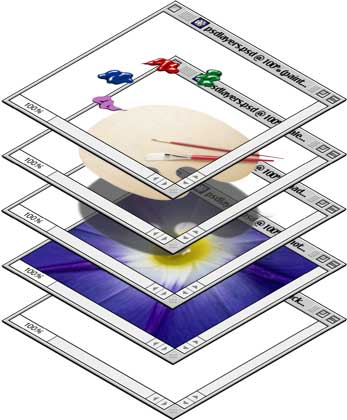
The other thing I had to pick up fast was the use of layers.
Layers are basically like separate images that are “stacked” together to form the finished image. They can be displayed or not displayed at any given time, depends on what you’re doing at that precise moment.
Also note that layers are processed from the top down, that is the bottom most layer are stacked underneath the higher up layers. Confusing ? Try dragging and dropping them up and down and see how things change.
Labeling layers with meaningful names is highly recommended. I ended up with “Outline”, “Sunglasses Outline”, Sunglasses 2″, “Hat”, “Hat Shaddow”, “Beard & Hair”, “Lips”, “Lips Shaddow”, “Skin”, “Skin Shaddow”, “Skin Shaddow 2”, “Original Image”, “Text”, “Wall Behind”, “Background”
Trust me, things will go a lot easier with well named labels.
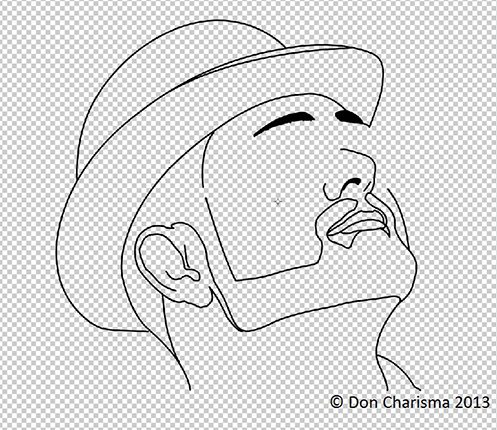
For example here is my “Outline” layer :
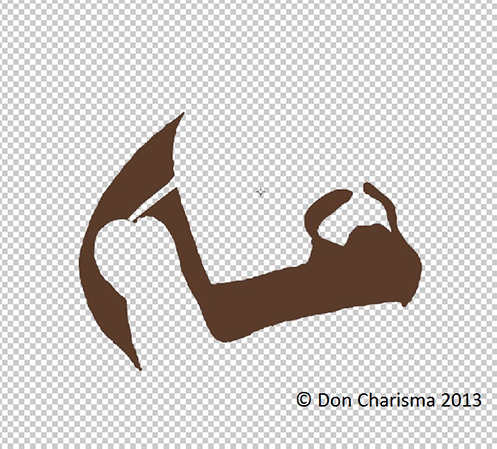
And this is my “Beard&Hair” layer :
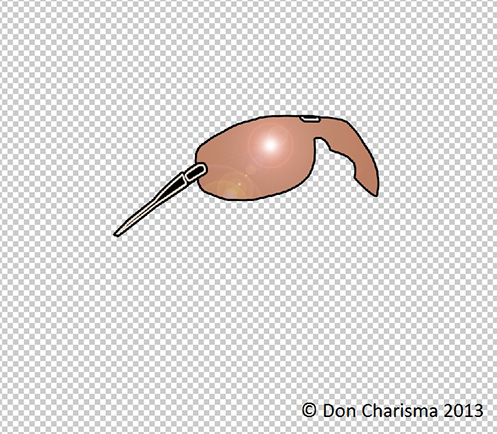
And this is my “Skin” layer :

Problems with the eyedropper/pipette
Personally, I’m not that great with colours, so struggle with picking colours. The pipette thing is great for this. However the colour that is picked is in a very small box, difficult for me to see the colour. On the YouTube video Stephen has a circular addition to pipette tool which looks really handy, but I can’t see how to add it in on my Photoshop CS6. If anybody know then please let me know. Maybe it’s a new feature on Photoshop CC ?
(Update 11-Jul, I found out what the circle thingy is called it’s the “sampling ring”, still not sure why I can’t use it !)
 The Sunglasses
This was a bit of challenge because I didn’t have a tutorial for the sunglasses. My sunglasses in the original photo are see-through (you can see eyes and face through them). So my solution was to do it my own way with two layers –
“Sunglasses Outline” – This is basically a black line outlining the sunglasses and frame (all with Pen Tool). Later I added the little flourish to the stems, the side and the top. Again pen tool, used black and near white (from the original photo).
“Sunglasses 2” – This was filled with a colour that I picked from inside the sunglasses lens area. I used the opacity function of the layer to tone it down a bit. For the “sun” reflecting off the glasses I used the Filter –> Render –> Lens Flare tool in Photoshop
A word on shading
Shading really bring the image to life and is well worth the effort. Stephen’s method is to use different layers for say “skin”, then “skin shaddow”, then “skin highlight”, and use a mid-tone for “skin”. This would work fine. My way is slightly different in that I used a light tone for “skin”, then for “skin shaddow” added patches on top of skin and then for “skin shaddow 2” added patches on top of both.
A word on using the keyboard
There was a couple of things I just couldn’t figure out how to do using the menus in Photoshop. One was the inverse of the current selection (isn’t on the edit menu on CS6). For this I found the shortcut, simply CTRL + I
The other was how to turn of the damn marquee thing (if you don’t then you find Photoshop will stop you from painting and erasing, confusing, yup it is). To turn off the marquee, use CTRL + D
Don’t know what this is for Apple users, I don’t use OSX, maybe command + the letter ?
More on keyboard shortcuts here – http://digital-photography-school.com/28-more-exceptionally-useful-photoshop-shortcuts
Conclusion
Making a cartoon image from a photo with Photoshop isn’t all that difficult. With the help that is available online from people like Stephen Bradbury, FallenDesignsUK videos on YouTube, you should be able to do what you want. It took me about two days to do in the end, as there were some time consuming bits and getting the hang of photoshop takes some patience. Keep at it and the rewards will come, eventually.
Big thanks to Stephen Bradbury for the videos, very much appreciated.
Enjoy
Don Charisma
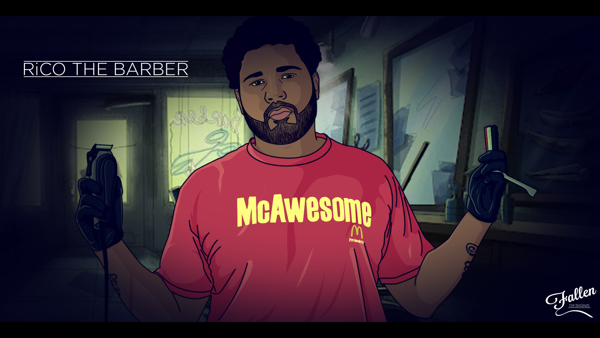
I leave you with “Rico The Barber” by Stephen Bradbury, awesome!:
Resources
For a step by step guide, also check out http://www.vectorportraits.com/

WOW! I can only imagine the time and effort that took to create! I’m impressed and inspired!
Was a lot of time, but I thoroughly enjoyed doing it 🙂 … and great that it’s positive for you …
Reblogged this on Chew on this! and commented:
This is really cool! I want to make one!!
What is the app called !?
Yeah! It is awesome. I like your avatar. Don Charisma, you make it interesting.
Thanks my friend, that’s very kind of you 😀
I don’t know if my first post went through. Anyway, I am pulling my hair out. How do you start another path without closing the last path?
Thanks for the info!
It went through 😀
Love the information. How do you make paths that don’t have to be closed? He says it in the video but I when I start a new path it wants to connect.
It’s been a while since I did the post, so sorry I can’t remember !
Very helpful. Thanks!
You are very welcome, I wrote it for you 🙂
What’s the app called
No eyed deer
Don, this process is so interesting, even though I don’t have Photoshop. I love good graphics of all kinds, especially portrait paintings.) Great job, and thanks for introducing us to Stephen Bradbury’s video tutorial, too.
My pleasure … there is also a free alternative to Photoshop called GIMP, you might want to try that.
Hello, thanks for showing an interest in my blog, A Leopard in Didsbury. I have always wanted to cartoonify myself (for real, would be good). I’ll try this 🙂
My pleasure and thank you for dropping in on my blog:)
The challenge with the cartoon I feel is the little things that need to be learn’t, but once learn’t it’s just then a case of coming up with good ideas, I like going for a walk with some music on my iPhone, this helps get the creative flow going…
Hope you’re successful with the cartoon, let me know how you get on …
Cheers, Don Charisma
Yes, my dog takes me for a walk twice a day, most days. Good for blowing the cobwebs away. Thanks for the good wishes.
Awesome post. So now I know I’m not the only one who’s wasted countless hours searching for a good convert-me-to-cartoon website. I tried a lot of the freebies too – to my utter disappointment. Thanks for the video link above! Hopefully I’ll get some free time to update my own avatar 🙂
Thanks and my pleasure:) the only options online that I could find were paid ones and most of those I didn’t like their prior work. Eventually I stumbled across the guy from FallenDesignsUK. Really helpful to see the exact steps and exactly what he’s doing on photoshop. It’s time consuming but really rewarding and also it’s given me the confidence to do more with photos and art on photoshop, so side benefits too ! Next thing I want to tackle is illustrator, but that’s been a steep learning curve so far…I have a really graceful photo of my girlfriend I’d like to do for her, but I’m a bit worried about ballsing that up … SO I look around on youtube when I get a chance see if there’s a tutorial for illustrator.
Good luck with your blog and you cartooning:) I’ve added you on my links –> friends, you doing the same helps people find our blogs 🙂
Keep in touch …
Cheers
Don Charisma
Okay, so I spent 5 hours last night on my cartoon. I’m using photoshop CS4.
When using the pen tool and then selecting the “stroke path”, my lines are blurred. I selected the solid 3 for the brush, and set the hardness to 100%, but the lines still look a little blurry. It wasn’t really bothering me until I got to my sunglasses. I can’t seem to get a nice crisp outline for the rims.
Still, I wanted to thank you for the info you provided in this blog and for the link to the tutorial. Even though I lost an entire evening playing around with photoshop, it was interesting and a lot of fun!
I’ve found that sometimes Photoshop doesn’t actually display on screen in full/best resolution. Suggestion, first save the .psd for the project then do a save as .jpg, maximum quality, then open in another picture viewer app on windows Paint or Photo viewer. I say this because my lines where “blocky” when displayed in Photoshop but smooth once I saved the .jpg file. I’ve sent an email to your email address, if you want you could send me a screenshot or snip (windows 7 – snipping tool) (if the JPG saving thing doesn’t fix it). Other problems that I can think of are perhaps the brush that’s in use, photoshop can use a variety of different brushes…
I believe perhaps the first problem is what you’re describing.
Cheers
Don Charisma
Cool, man. I love just the act of searching for graphic tutorials. I just luuuve to learn about it. I don’t know much, and I don’t have photoshop (do you have the expensive one?) but I survive with ppt and learning ‘tricks’ to animate or change photos into something cool and different. I will try to do what you described but without photoshop. I’m sure there are alternatives online. Man, you can find jjust about EVERYTHING online. Ohhhh, I’m addicted….
Hey thanks for kind comments … you can download Adobe Photoshop Trial free from http://prodesigntools.com/adobe-cs6-direct-download-links.html free to use for 30 days if you want have a play around … the latest version is available here – http://prodesigntools.com/adobe-cc-direct-download-links.html
enjoy !
Keep in touch …
Cheers
Don Charisma
Thanks for liking my blog – this was a really good result and I looked Tyler’s video too.
Hey there, it’s my pleasure … I had some real fun doing it and couldn’t be happier with the result, this kid that did the video is awesome 🙂
I’ve added you on my links –> friends, you doing the same helps people find our blogs 🙂
Keep in touch …
Cheers
Don Charisma
https://doncharisma.wordpress.com
Very instructive!, good job!!! Thanks for sharing!!! 🙂
My pleasure, had a lot of fun doing it and very pleased with the result … not sure what’s next for my initiation into graphic design !
Cheers
Don Charisma
https://doncharisma.wordpress.com
I’ve been using Photoshop for years and never got to grips with the pen tool. Your cartoon is great so I’m definitely going to watch the guy’s tutorial. Thanks for sharing.
Really like your avatar (lens flare is a nice touch) and LOVE the fact that it’s giving people an alternative to photos.
I’ll be back on your blog to follow the tutorial for fun!
Maybe it will give me ideas for my fabrics :).
Thank you for sharing, I like when people are proud and explain fully there path to the final results.
Thanks Julie! I couldn’t work out how to do the sunglasses and then came across the lens flare, perfect !
Now I’m a little more educated in photoshop and design, I found that there are lots of vector designs already out there to use for backgrounds, logos, etc … today I found http://all-free-download.com/ loads of designs on there …
I’m learning to be a better communicator online, so writing a how-to now and then helps me for practice writing and also helps to memorise what I’ve learnt, so win-win really
Good luck with you blog and fabrics,
Cheers
Don Charisma
https://doncharisma.wordpress.com
May have to give this a try….I keep working on learning more ins and outs of Photoshop and your tip on the Pen info helps. Thanks.
My pleasure, just wanted to share my experience and hopefully add the the FallenDesignsUK video … There’s also a tutorial here http://www.vectorportraits.com/
I think the next one I try will be on Illustrator as I’d like to be able to Scale the finished images to any size (not sure if that can be done with Photoshop)
Good luck with your blogging, let me see your picture once your done …
Cheers
Don Charisma
https://doncharisma.wordpress.com
This is cool
Thanks Andrew:)
Good luck with your blogging…
Cheers
Don Charisma
https://doncharisma.wordpress.com
Hey Charisma, thanks for the follow at drawnupon.com.au. I am a graphic designer so now you do have someone to ask those questions about photoshop. If you want the answers to some of your questions posed above, drop me a line. Col
Hi Colin, great, a graphic designer friend:)… I’ve got some upcoming projects so would be handy to be able to be in touch. Art they wouldn’t let me do at school, can’t remember why…Still, now as an adult I can do what I want, and enjoying messing about with graphics so all good !
I’ve added you in my links (have a memory like a sieve)
Many thanks
Don Charisma
https://doncharisma.wordpress.com
Excellent, you and I sound like polar opposites, all I did was art and the maths teachers suggested my efforts would be better utilized elsewhere.
Contact me should you need anything, I am a freelancer available for hire.
All the best,
Colin
Hi Colin, I like the Peaceful warrior’s simple rules of life one of which is paradox, resolution of which is both sides of paradox, perhaps we’ll cancel each other out LOL
I have a project speaking to some friends at the moment which will need graphic design, I’ve already put your blog in my links so will be in touch …
Cheers
Don Charisma
https://doncharisma.wordpress.com
Sounds great, you can contact me through the blog.
Wow. Thanks. I might try this myself.
Not actually that difficult, just time consuming and sometimes frustrating… good to be accessing creative circuits in my mind anyway:)
Cheers
Don Charisma
https://doncharisma.wordpress.com
This is great! I have done this before and had loads of fun doing it. Good job 😀
Yes, too much fun to be had with photoshop and really pleased FallenDesignsUK was able to give me the confidence to do it.
Cheers
Don Charisma
https://doncharisma.wordpress.com